Raw. Bold. Unapologetic.

The New Era of Blogging.

Exploring the intersection of design, technology, and neobrutalist energy. Join the movement.

Start Reading

Latest Stories

Arrays Explained: Basics things You Need to Know


Arrays are one of the most fundamental data structures in programming. They’re simple to use, yet powerful in storing multiple elements efficiently. But have you ever wondered what happens behind the scenes when you use an array? Why do different programming languages have various ways of declaring arrays? What are static and dynamic arrays, and how do they differ? How does an array store data in memory (RAM)? Let’s dive in and explore!

What is an Array?

An array is a container for storing data. Think of it like a series of boxes, each capable of holding one piece of data. When you store data in an array, it’s saved in the computer’s RAM (Random Access Memory), just like any other variable. Throughout this post, when I refer to "memory," I’m specifically talking about RAM.
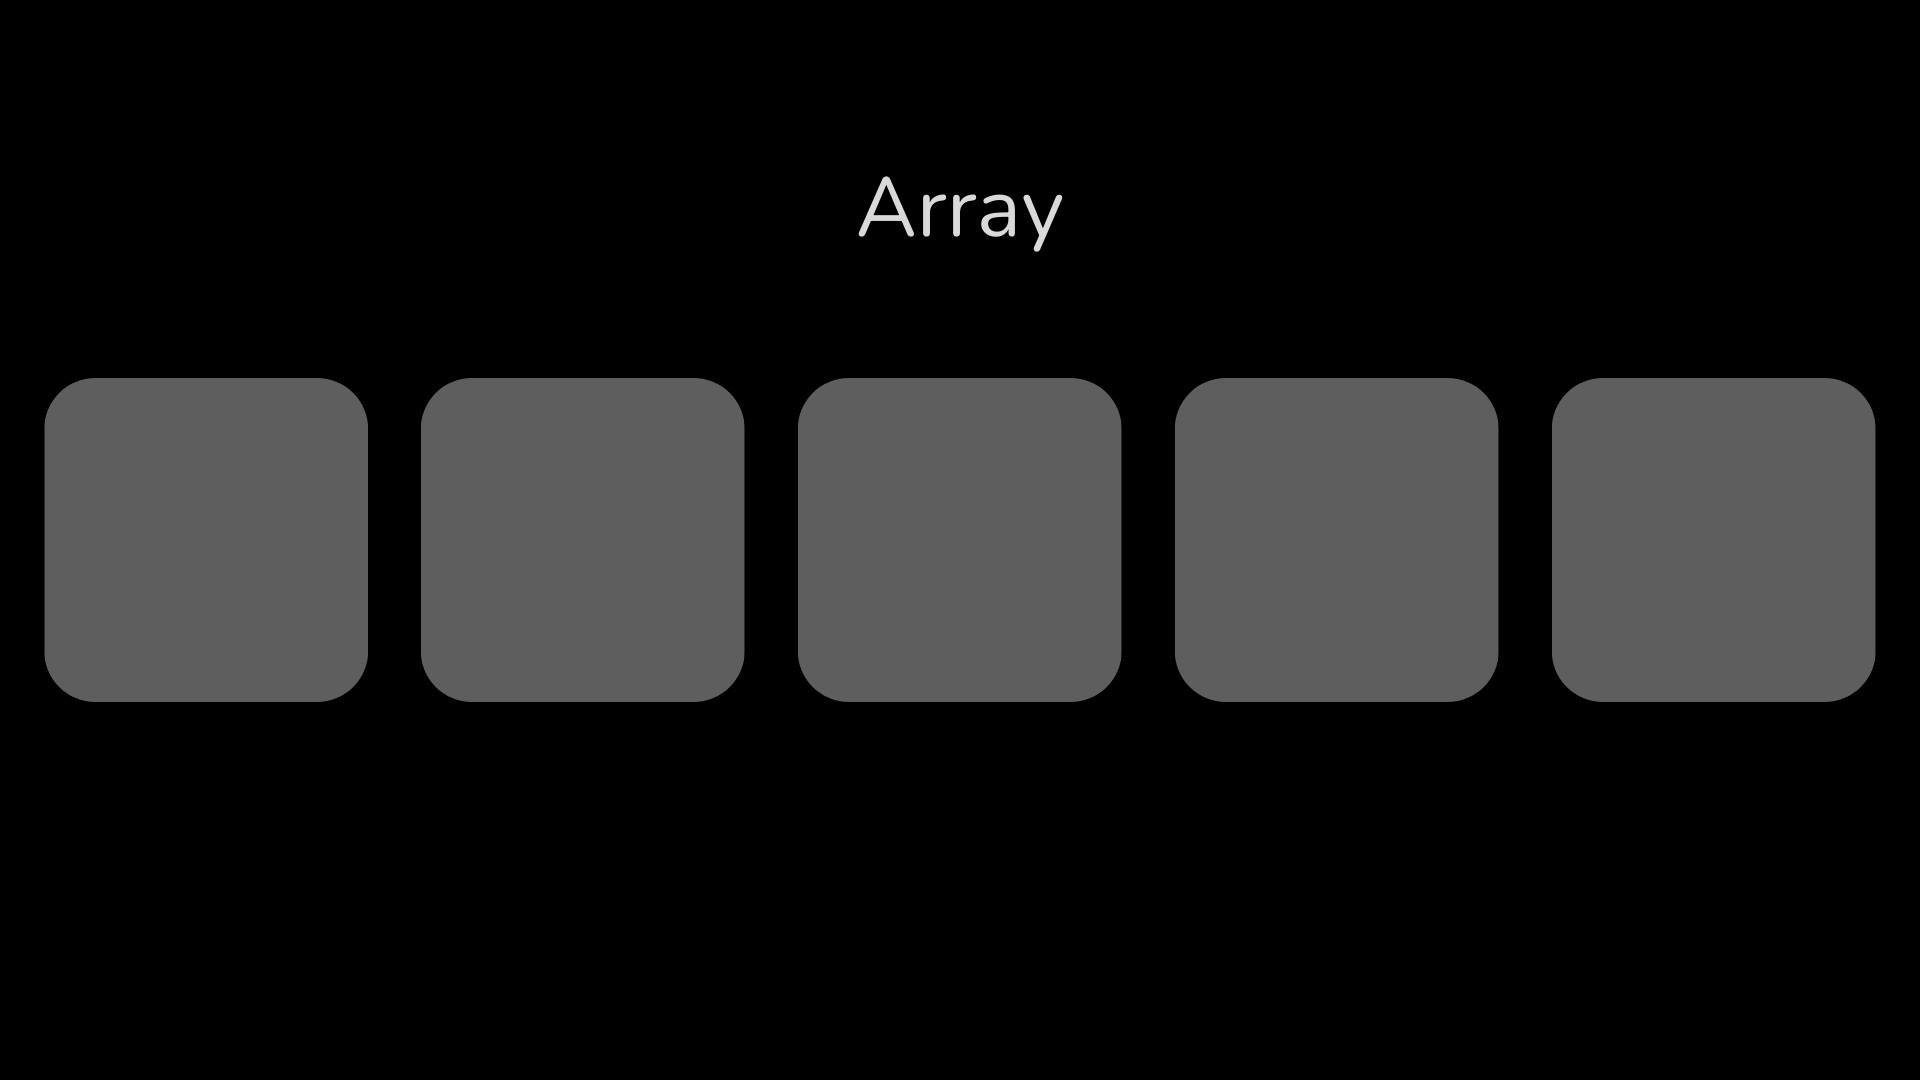
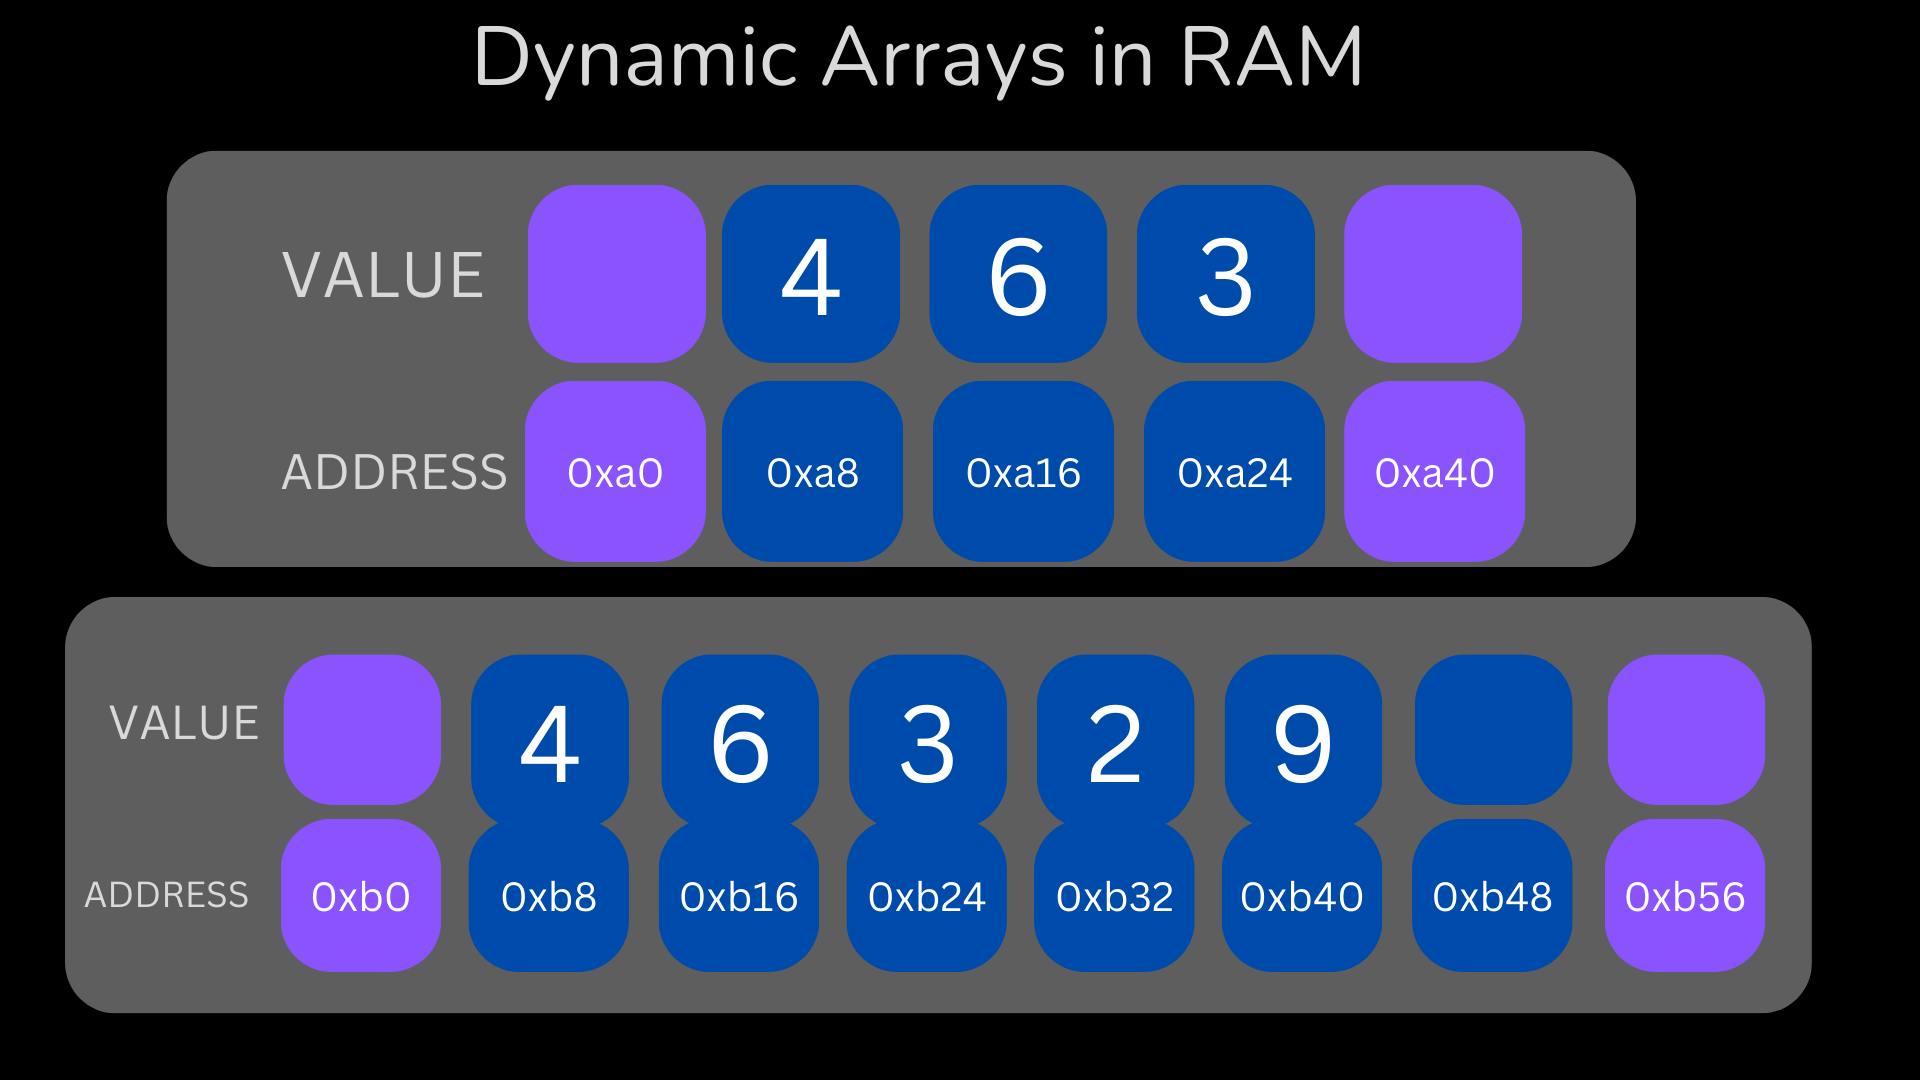
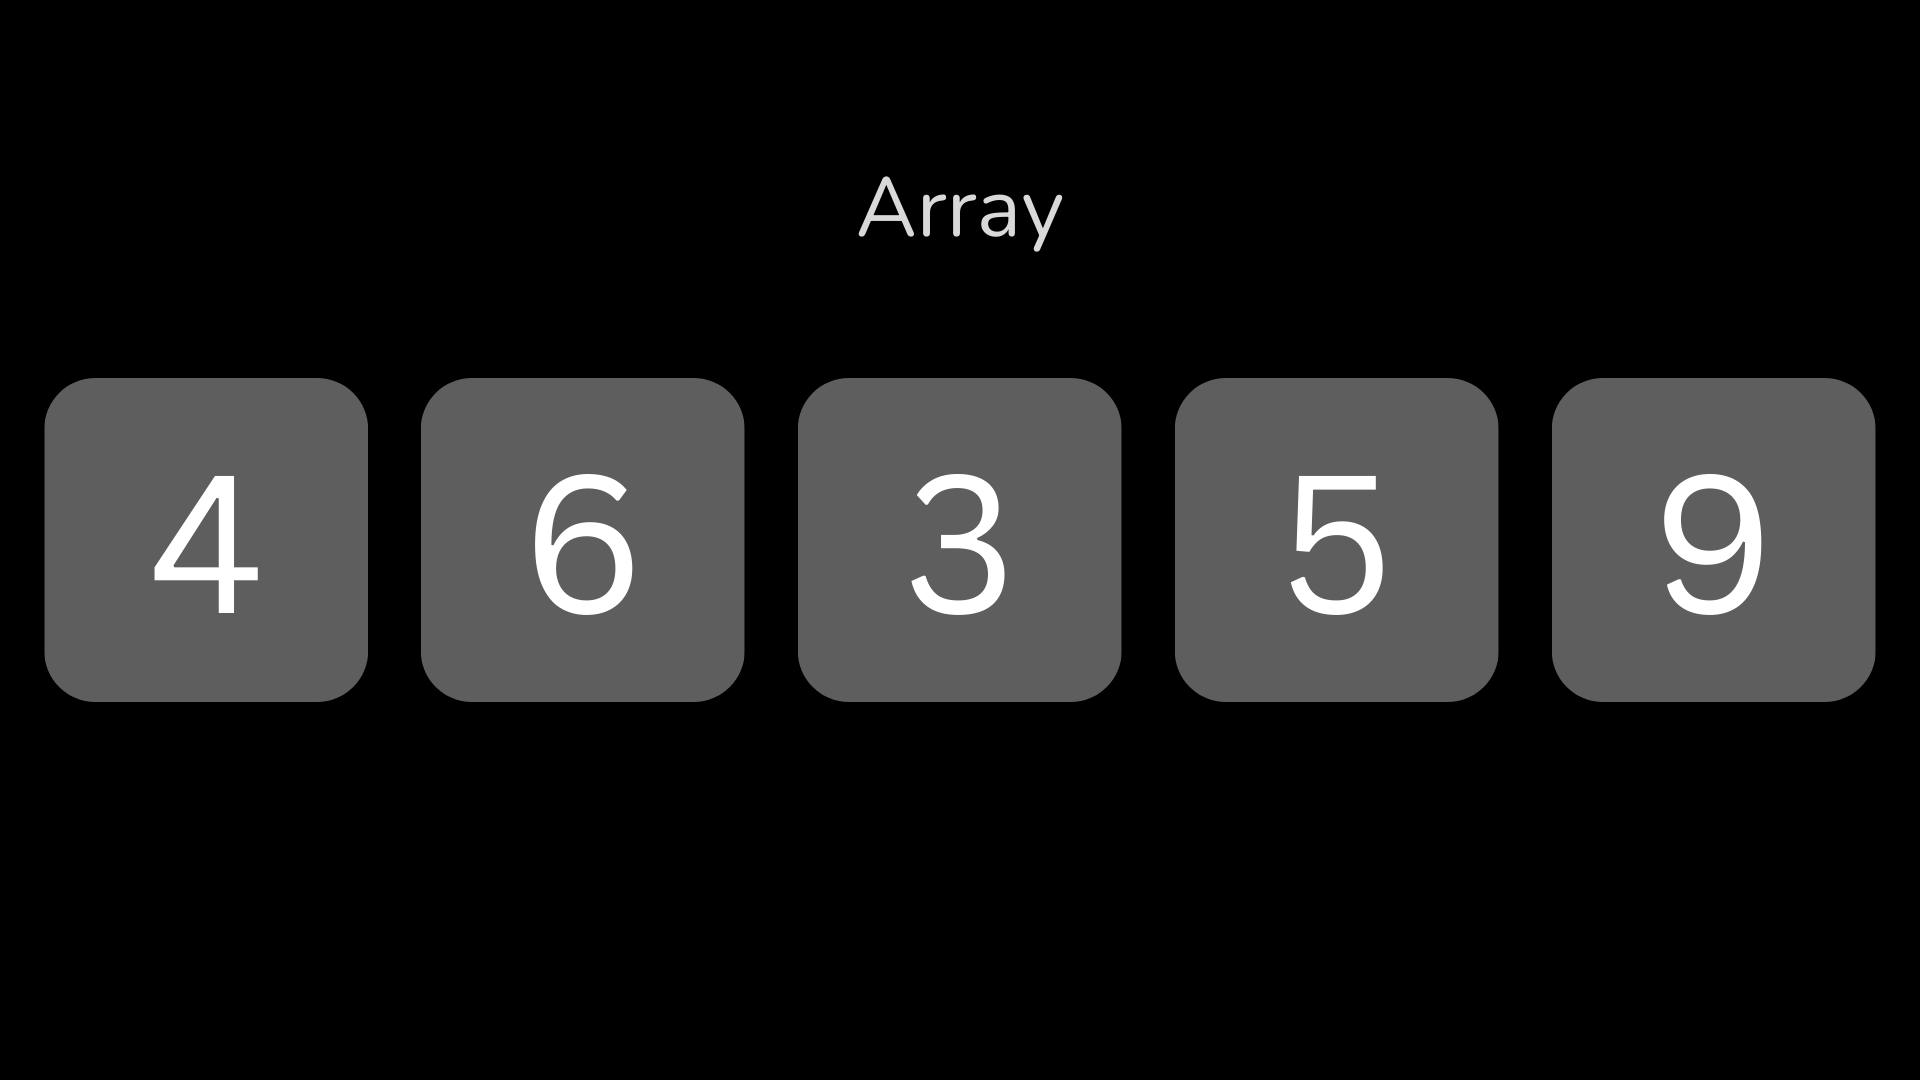
Arrays store data as bytes. For example, if we add the values 4, 6, 3, 5, and 9 into an array, each of these numbers (depending on the type of data, like integers) might take up a certain number of bytes. In this case, assume each number takes 1 byte (or 8 bits). So, we’re storing five bytes of data in the array, and this is how they’d be arranged in memory:
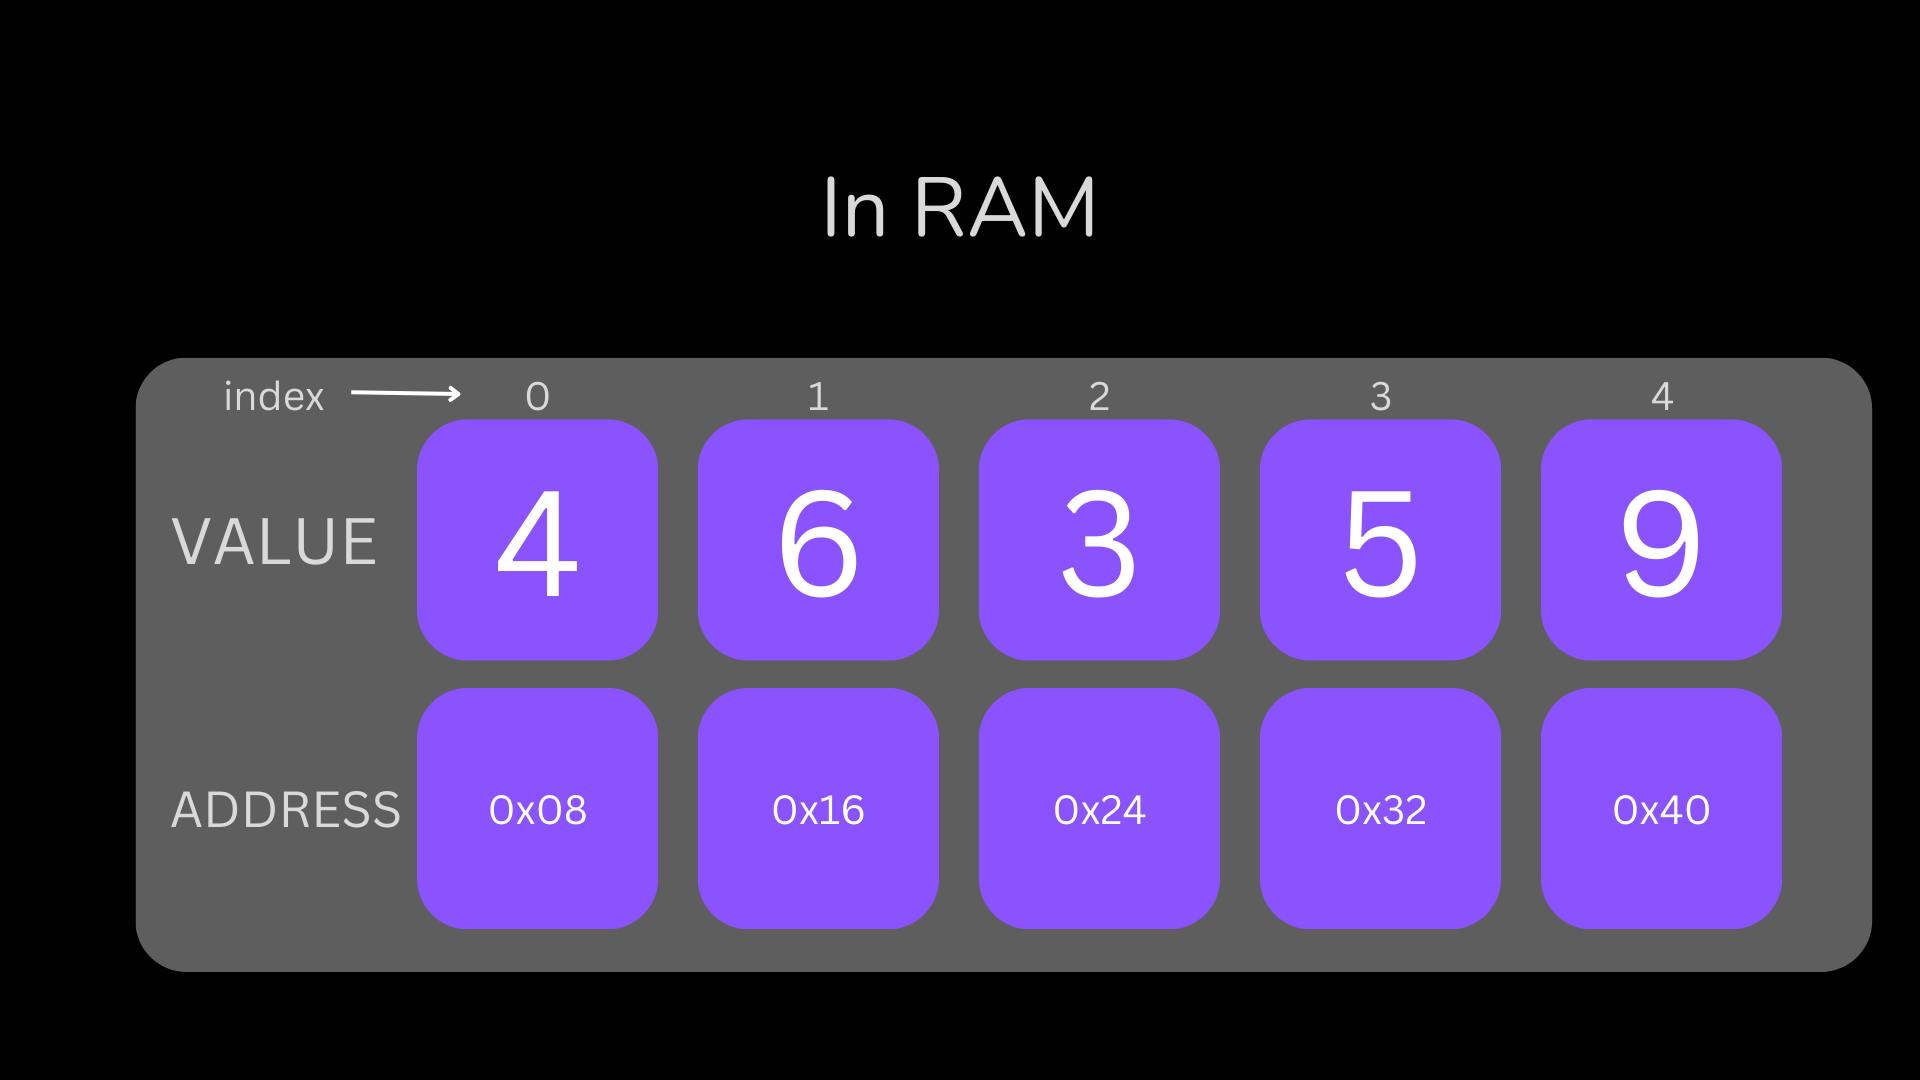
You access the data in an array by its index. In most programming languages, array indices start at 0, meaning the first element is at position 0. In a fixed-size array, you can easily access, modify, or delete elements at any index.

Memory Allocation in Arrays

When we create a fixed-size array, we inform the system of the amount of memory we need. The system then allocates that memory and returns a reference (or address) to it. This is where we can start performing operations on the array.

Here are a few common operations and their Big O time complexities:

  1. Access O(1)

  2. Modify 0(1)

  3. Remove 0(n): Let’s break down the Remove operation: When you remove an element, say from the middle of an array, the remaining elements must shift to fill the gap. For example, if the array is [1, 2, 3, 4, 5] and you remove 3, it becomes [1, 2, _, 4, 5]. After removing 3, the remaining elements are shifted to fill the space: [1, 2, 4, 5, _]. Removing takes constant time, but shifting elements takes O(n) time, where n is the number of elements in the array.

  4. Create 0(n)

When you create an array, the process involves allocating space in memory. In a fixed-size array, the memory is reserved ahead of time, making operations constant. However, dynamic arrays are a bit more complex.

Static vs. Dynamic Arrays

There are two main types of arrays:

  1. Static Array: The size is fixed when you create the array.

  2. Dynamic Array: The size can grow as needed. It’s not fixed.

Now that we’ve covered static arrays, let’s move on to dynamic arrays.

Understanding Dynamic Arrays

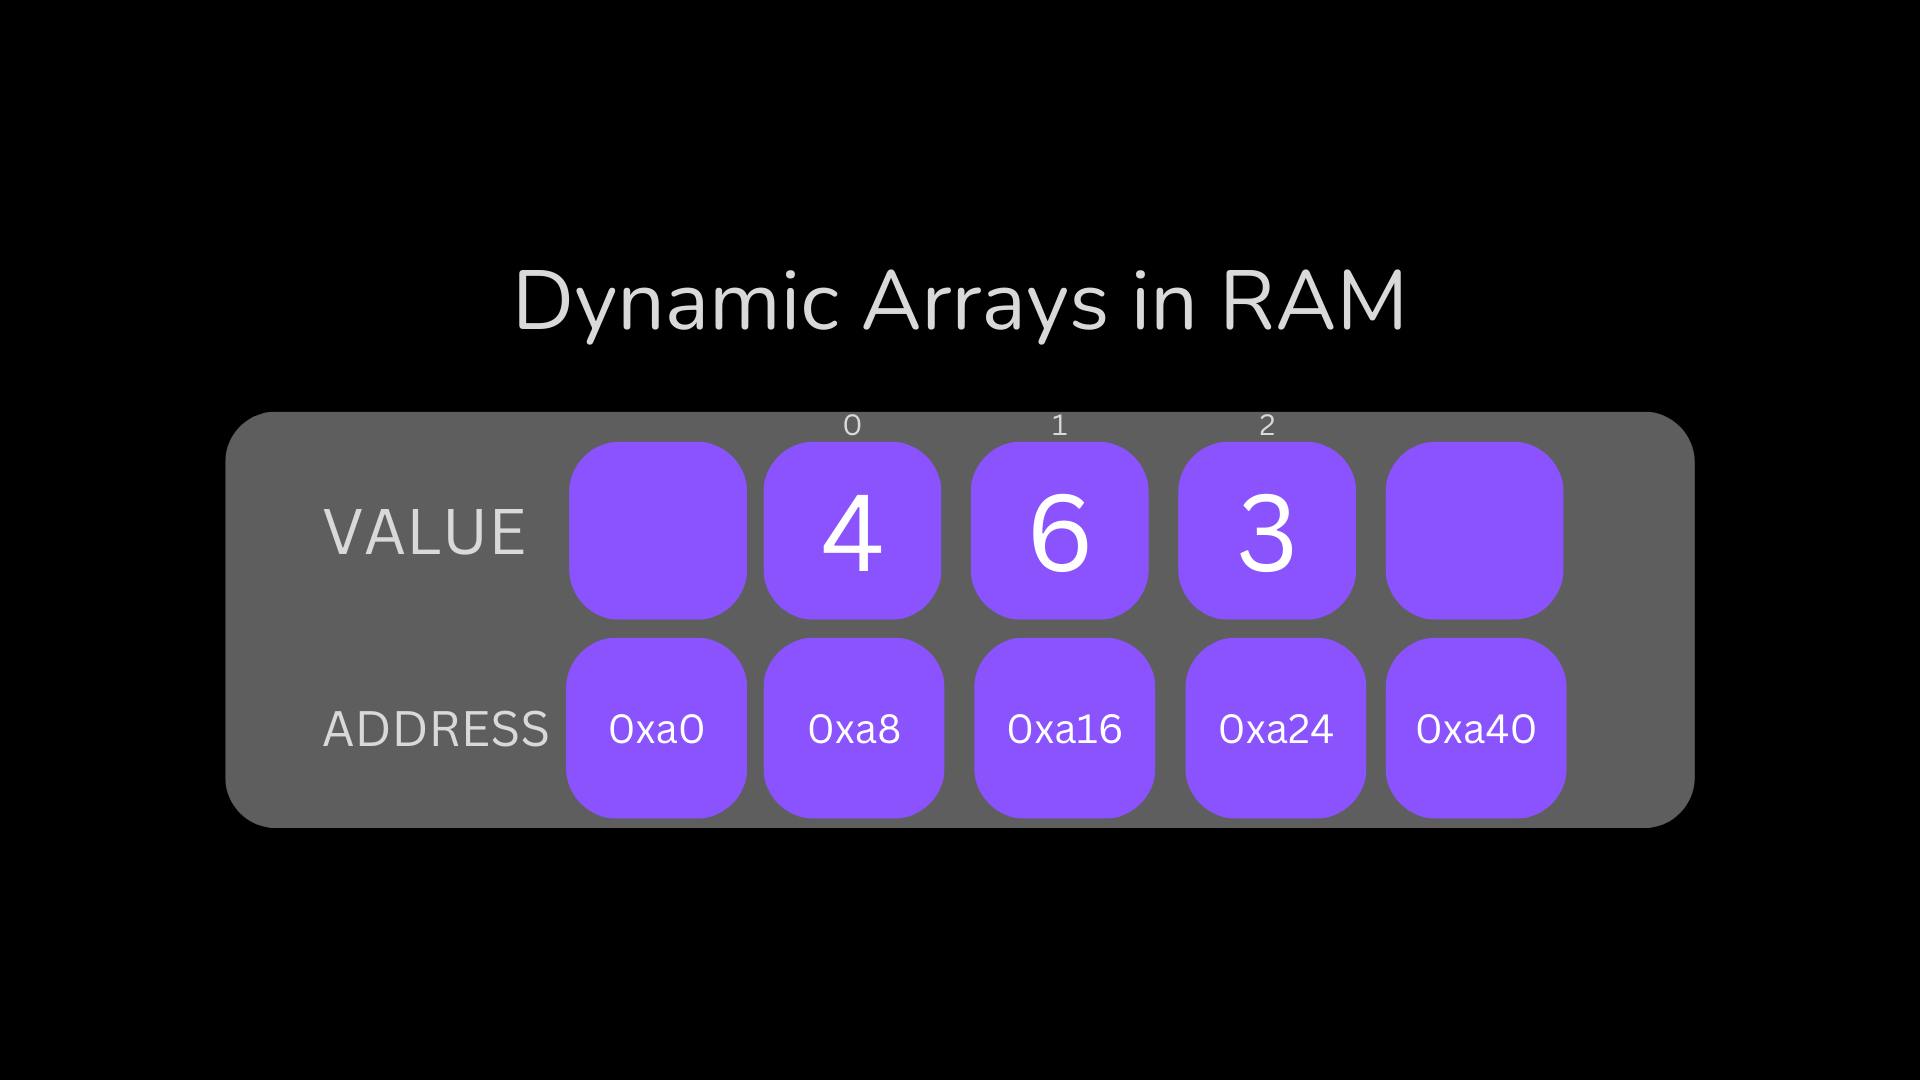
As mentioned, a dynamic array doesn’t require you to specify a size up front. Languages like Python and JavaScript use dynamic arrays by default. However, no array can be truly unlimited in size. Let’s say a dynamic array starts with a size of 3. When you fill all three positions, the array creates a new, larger array behind the scenes. This new array is typically double the size of the original one. For example, if the original array has a size of 3, the new one will have a size of 6.

Here’s what happens under the hood:

  • A new array with double the size (6) is created.

  • The values from the old array are copied into the new array.

  • The old array is deallocated (freed from memory).

This process of reallocating memory and copying elements takes O(n) time.
Time Complexity of Dynamic Array Operations

Dynamic arrays have similar time complexities to static arrays:

  • Access: O(1)

  • Modify: O(1)

  • Remove: O(n)

  • Create: O(n)

That’s the essence of arrays! I hope this explanation was short and simple enough. If you have any suggestions or if something isn’t clear, feel free to let me know!


September 28, 2024 Read →

Unofficial Warp Client on Linux (WGCF+wireguard)

WGCF is an unofficial, cross-platform CLI for Cloudflare Warp. It works with Wireguard. So before installing WGCF make sure you’ve installed

`wireguard-tools`

`wireguard-dkms` (if you’re using a Linux Kernel older than 5.6)

Note : You’ve to restart your system if you install wireguard-dkms.

You can install pre-compiled binary file from it’s releases or you can install it from AUR if you’re using Arch derivatives.

Install binary package
Download the package you need from release page. Then rename the file wgcf, make it executable and copy it to /bin directory.
```
chmod +x wgcf
sudo cp wgcf /bin
```
Or you can install from AUR if you use Arch

`yay -S wgcf`
Now we will create a Warp account

`wgcf register`
And generate a Wireguard configuration using that account information

`wgcf generate`
We’ve to connect to Warp using that Wireguard configuration. It’d be much easier if you put that configuration file in /etc/wireguard

`sudo cp wgcf-profile.conf /etc/wireguard`
Let’s connect now

`wg-quick up wgcf-profile`
If you want to disconnect, run

`wg-quick down wgcf-profile`
Probably you’d like to run Warp every time when your system boots. You can do that with help of systemd

`systemctl enable --now wireguard@wgcf-profile`
July 26, 2024 Read →

Guide to Installing MariaDB/MySQL on Arch Linux

Introduction

Installing MariaDB or MySQL on Arch Linux can be a daunting task, especially if you're not familiar with the intricacies of the Arch environment. This guide aims to be a comprehensive, one-stop resource to help you get MariaDB/MySQL up and running on your Arch Linux machine.

Preparation

Before we dive into the installation process, ensure your system is up to date. Run the following command:

sudo pacman -Syu

This updates your system and minimizes the chances of encountering issues during the installation process.

Step 1: Installing MariaDB/MySQL

Arch Linux offers both MariaDB and MySQL for installation. MariaDB is a community-developed fork of MySQL, and it's often recommended due to its active community and consistent updates.

To install MariaDB, use the following command:


sudo pacman -S mariadb


Alternatively, for MySQL, use:


sudo pacman -S mysql

Step 2: Initializing the Database

Once the installation is complete, you need to initialize the database directory. This step is crucial for setting up the system tables and preparing the database for use.

Run the following command:


sudo mysql_install_db --user=mysql --basedir=/usr --datadir=/var/lib/mysql

If the initialization is successful, you will see a message indicating that the system tables have been installed.

Step 3: Starting the MariaDB Service

With the database initialized, you can now start the MariaDB service. Use the command below:


sudo systemctl start mysqld

In case of errors, check the status of the service for more details:


systemctl status mariadb.service

and
journalctl -xe

Step 4: Securing the Installation

Securing your MariaDB installation is an important step to ensure your database is protected. Run the following command to start the secure installation process:


sudo mysql_secure_installation

You'll be prompted to set the root password and make several security-related decisions. Follow the prompts to complete the setup.

Step 5: Creating Your First Database

Now that MariaDB/MySQL is up and running, you can create your first database. Access the MariaDB/MySQL shell with the command:


sudo mysql -u root -p

Enter the root password you set during the secure installation process. Once in the shell, create a new database with:


CREATE DATABASE mydatabase;

Replace "mydatabase" with your desired database name.

Conclusion

Installing MariaDB/MySQL on Arch Linux can be challenging, but by following this guide, you should have a functioning database system ready for use. Remember to keep your system and database software updated to avoid potential issues. If you encounter any problems, refer to the Arch Linux forums and documentation for additional support.

Summary

  • System Update: sudo pacman -Syu
  • Install MariaDB: sudo pacman -S mariadb
  • Initialize Database: sudo mysql_install_db --user=mysql --basedir=/usr --datadir=/var/lib/mysql
  • Start MariaDB Service: sudo systemctl start mysqld
  • Secure Installation: sudo mysql_secure_installation
  • Create Database: CREATE DATABASE mydatabase;

Good luck, and happy coding! 🎉

July 06, 2024 Read →

Mastering Productivity: Firefox's URL Bar as a Powerful Calculator


Introduction:

When it comes to browsing the web, Firefox has long been a popular choice among users due to its flexibility and customization options. However, did you know that there’s a hidden gem within Firefox that can transform your browsing experience? By enabling the calculator functionality on the Firefox URL search bar, you can perform quick calculations without the need for a separate calculator application. In this article, we will guide you through the steps to unlock this feature and enhance your productivity while using Firefox.

Step 1:

Accessing Firefox’s Advanced Configuration Settings To begin, we need to access Firefox’s advanced configuration settings, also known as about:config. Follow these steps:

  1. Open a new tab in your Firefox browser.
  2. In the URL bar, type about:config (without the quotation marks) and press Enter.
  3. A warning message will appear, acknowledging the risks of modifying advanced settings. Proceed with caution as these settings control the browser’s behavior.
  4. Click on the “Accept the Risk and Continue” button to access the configuration settings.

Step 2:

Enabling the Calculator Functionality Once you have successfully accessed the advanced configuration settings, it’s time to enable the calculator functionality on the URL search bar. Here’s how:

  1. In the search bar within the about:config page, type “browser.urlbar.suggest.calculator” (without the quotation marks).
  2. The search results should display a single preference named “browser.urlbar.suggest.calculator.”
  3. By default, the value of this preference is set to “false.” To enable the calculator, double-click on the preference.
  4. The value will change to “true,” indicating that the calculator functionality is activated.
firefox config

Step 3:

Utilizing the Calculator on the Firefox URL Search Bar Congratulations! You have successfully enabled the calculator functionality on the Firefox URL search bar. Now, let’s put it to use:

  1. Click on the URL bar at the top of your Firefox browser window.
  2. Begin typing a calculation, such as “2 + 3 * 4” (without the quotation marks).
  3. As you type, you will notice that Firefox automatically suggests the calculated result in a dropdown list below the URL bar.
  4. Press Enter to select the suggested result, and Firefox will instantly display the answer in the URL bar.

Conclusion:

Following these simple steps, you have unlocked a powerful feature in Firefox that allows you to perform quick calculations directly from the URL search bar. This hidden calculator functionality enhances your browsing experience by eliminating the need for a separate calculator application. Whether you’re a student, professional, or simply someone who frequently performs calculations, Firefox’s built-in calculator is a valuable tool at your fingertips. Boost your productivity and streamline your workflow with this fantastic feature in Firefox. Give it a try today and enjoy the convenience of on-the-fly calculations while browsing the web.

June 20, 2023 Read →

Beyond SVG: Discovering the Top Alternatives for Flutter Development


Introduction:

When developing Flutter applications, incorporating SVG (Scalable Vector Graphics) files can add visual appeal and flexibility to your UI. However, the standard approach of using the flutter_svg package to render SVG files may result in larger file sizes, potentially impacting app performance. In this article, we will explore an alternative method that allows you to utilize SVGs in Flutter without the need for additional assets. By following the steps outlined below, you can achieve faster, smoother rendering and smaller file sizes for your Flutter projects.

Step 1:

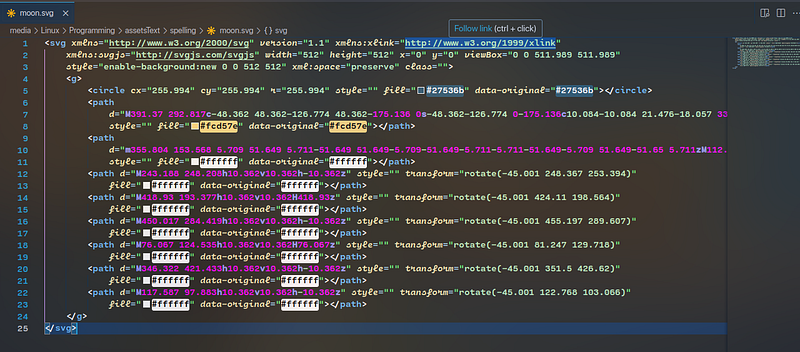
Copy the SVG Code To begin, locate the SVG file you wish to incorporate into your Flutter project. Instead of using the flutter_svg package, we will convert the SVG code directly into Flutter code. Copy the SVG code from your file.

Step 2:

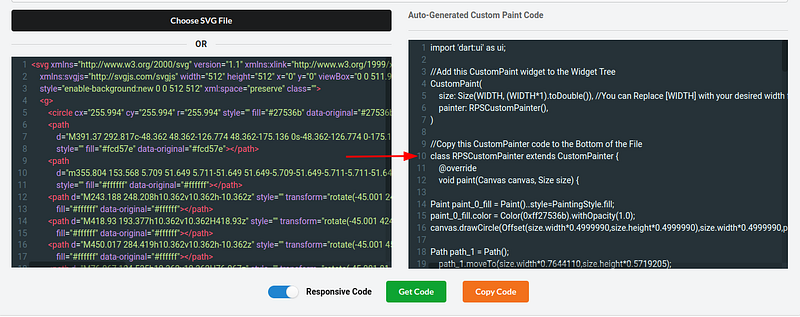
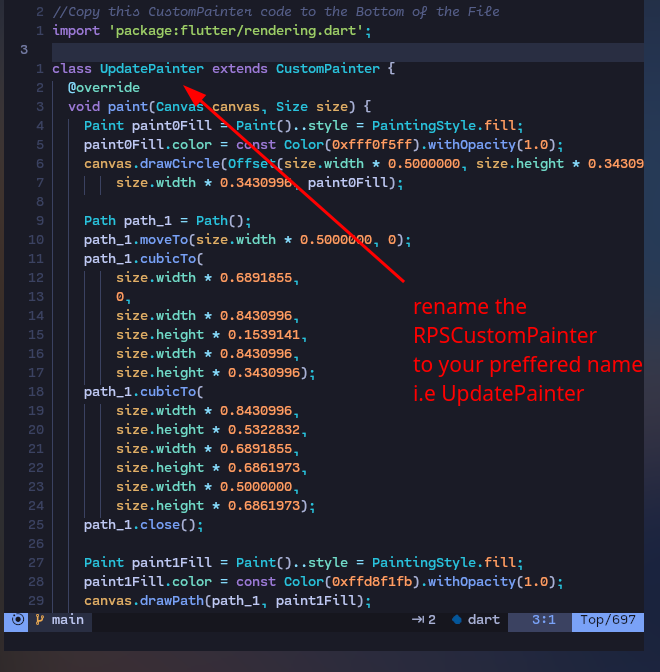
Convert SVG to Flutter Painter Next, visit the website “Flutter Shape Maker” at https://fluttershapemaker.com/. This online tool enables you to convert SVG code into Flutter CustomPainter code, which can be directly used to render the SVG in your Flutter project.

Paste the SVG code into the provided text box on the Flutter Shape Maker website. The tool will automatically generate the corresponding Flutter CustomPainter code based on the SVG. This code will contain the necessary instructions to render the SVG as a visual element in your Flutter UI.

Step 3:

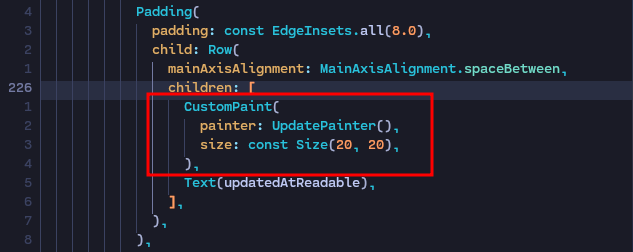
Implement the CustomPainter in Your Flutter Project Now that you have the generated CustomPainter code, you can incorporate it into your Flutter project. Create a new Flutter widget or modify an existing one to include the CustomPaint widget. The CustomPaint widget allows you to draw arbitrary graphics using the provided CustomPainter implementation.

Inside the CustomPaint widget, set the painter property to an instance of the CustomPainter class generated by the Flutter Shape Maker website. This will ensure that the SVG is rendered correctly within your Flutter UI.

Additionally, remember to specify the desired size for the SVG by setting the size property of the CustomPaint widget. This ensures that the SVG is displayed at the intended dimensions within your UI.

Conclusion:

By following the steps outlined above, you can optimize the rendering of SVG files in your Flutter projects. By converting the SVG code into Flutter CustomPainter code using the Flutter Shape Maker website, you can eliminate the need for additional assets and achieve improved performance and smaller file sizes. This approach allows for faster and smoother rendering of SVGs, enhancing the overall user experience of your Flutter applications.

Remember to apply the suggested method the next time you need to incorporate SVGs in your Flutter projects, and enjoy the benefits of optimized SVG rendering.

June 02, 2023 Read →

Read Medium Article for Free

It is just quick and simple.

replace the medium.com/

with scribe.rip/


example:

Medium URL:

    ```https://medium.com/flutter/2023-google-mobile-ads-updates-for-flutter-16b603df9ec9```

Free URL:

    ```https://scribe.rip/flutter/2023-google-mobile-ads-updates-for-flutter-16b603df9ec9```


that's all :)

May 22, 2023 Read →

How to compress json file


For a single file use this:

 jq -c . all_json_words.json > minify_words.json


to use it in a for loop

for file in *.json; do
    jq -c . "$file" > "${file%.json}.min.json"
done
May 20, 2023 Read →

How to watch Dragon Ball in order by canon


 If you want to skip all the Dragon Ball that isn't considered canon, i.e the series and films which don't follow the events of the manga and were made without any input from creator Akira Toriyama, then there is an alternative watch order below.


Those entries considered non-canon include the series Dragon Ball GT in addition to the majority of the films. Then you also have to make the choice of whether to watch Dragon Ball Z for the more extensive experience or Dragon Ball Kai for the more refined approach.

Here is the list for fans who wish to watch Dragon Ball canonically:

  • Dragon Ball: all episodes
  • Dragon Ball Z or Kai: until the end of the Frieza Saga
  • Dragon Ball Z: Bardock – The Father of Goku (TV Special)
  • Dragon Ball Z: until the end of the Cell saga
  • Dragon Ball Z: The History of Trunks (TV Special)
  • Dragon Ball Z: all remaining episodes
  • Dragon Ball Super


How to watch Dragon Ball in chronological order


Here is how to watch Dragon Ball in chronological order:

  • Dragon Ball
  • Dragon Ball Z: Dead Zone (movie)
  • Dragon Ball Z: episodes 1-86
  • Dragon Ball Z: Bardock – The Father of Goku (TV Special)
  • Dragon Ball Z: episodes 87-107
  • Dragon Ball: Episode of Bardock (movie)
  • Dragon Ball Z: The World's Strongest (movie)
  • Dragon Ball Z: The Tree of Might (movie)
  • Dragon Ball Z: Lord Slug (movie)
  • Dragon Ball Z: episodes 108-123
  • Dragon Ball Z: The History of Trunks (TV Special)
  • Dragon Ball Z: episodes 124 and 125
  • Dragon Ball Z: Cooler's Revenge (movie)
  • Dragon Ball Z: episodes 126-146
  • Dragon Ball Z: Super Android 13 (movie)
  • Dragon Ball Z episodes 147-173
  • Dragon Ball Z: The Return of Cooler (movie)
  • Dragon Ball Z: Broly – The Legendary Super Saiyan (movie)
  • Dragon Ball Z: episodes 174-194
  • Dragon Ball Z: Bojack Unbound (movie)
  • Dragon Ball Z: episodes 195-207
  • Dragon Ball Z: Broly’s Second Coming (movie)
  • Dragon Ball Z: episodes 208-250
  • Dragon Ball Z: Bio-Broly (movie)
  • Dragon Ball Z: episodes 251-253
  • Dragon Ball Z: Fusion Reborn (movie)
  • Dragon Ball Z: episodes 254-288
  • Dragon Ball Z: Wrath of the Dragon (movie)
  • Dragon Ball Z: episodes 289-291
  • Dragon Ball GT: episodes 1-64
  • Dragon Ball Super: episodes 1-3
  • Dragon Ball Z: Battle of the Gods (movie)
  • Dragon Ball Super: episodes 4-18
  • Dragon Ball Z: Resurrection F (movie)
  • Dragon Ball Super: episodes 19-131
  • Dragon Ball Super: Broly (movie)
  • Super Dragon Ball Heroes
  • Dragon Ball Super: Super Hero
May 20, 2023 Read →

Make Android Emulator Working on Fedora i3wm

 I'll make this post very short and simple, so i could came back and see what i did after facing the problem.

first of all 

Install KVM on Fedora

First, check whether your CPU supports Intel VT / AMD SVM or not.

egrep --color 'vmx|svm' /proc/cpuinfo | wc -l

Output: If the output is non-zero, your machine has Intel or AMD virtualization support.

8
Then, install the KVM to have hardware acceleration for better performance of Android Studio if your machine supports VT technology.


sudo dnf install -y qemu-kvm bridge-utils libvirt virt-install


Now Install the Android studio from using any package manager.


Now if android emulator running slow on your Fedora then


run chattr +C command on both Sdk/system-images and ~/.android/avd directories

then run 

echo "QuickbootFileBacked = off" >> ~/.android/advancedFeatures.ini


I hope this helps future meh! :)


May 10, 2023 Read →

How to Convert SVG to PNG on Linux

How to Convert SVG to PNG on Linux

If you have an SVG image that you need to convert to a PNG image, Linux provides a simple solution using the convert command from the ImageMagick software suite. In this tutorial, we'll guide you through the process of converting an SVG image to a PNG image on Linux.

Prerequisites

Before we get started, make sure that you have ImageMagick installed on your Linux system. You can check if it's installed by running the following command in your terminal:

convert -version

If ImageMagick is not installed, you can install it using your distribution's package manager. For example, on Ubuntu or Debian, you can run the following command:

sudo apt-get install imagemagick

Once ImageMagick is installed, we can move on to the next step.

Step 1: Navigate to the Directory Containing Your SVG File

Open a terminal and navigate to the directory that contains your SVG file. You can do this using the cd command followed by the directory path. For example:

cd /home/username/images/

Step 2: Convert SVG to PNG

Now that you're in the directory containing your SVG file, you can use the convert command to convert it to a PNG file. Here's the command:

convert -background transparent input.svg output.png

In this command, replace "input.svg" with the name of your SVG file and "output.png" with the desired name for your PNG file. The -background transparent option makes the background of the PNG image transparent.

Step 3 (Optional): Resize the PNG Image

If you want to resize the output PNG image, you can use the -resize option followed by the desired dimensions. For example:

convert -background transparent -resize 500x input.svg output.png

This command resizes the output PNG image to 500 pixels wide.

Step 4: Check Your PNG File

Once the conversion is complete, you can check that your PNG file was created successfully by running the ls command:

ls

This command lists all the files in the current directory. Your PNG file should be listed along with any other files in the directory.

Conclusion

In this tutorial, we've shown you how to convert an SVG image to a PNG image on Linux using the convert command from the ImageMagick software suite. With these simple steps, you can quickly convert your SVG images to PNG images on your Linux system.

April 04, 2023 Read →

How to Fix the "Failed to Synchronize All Databases (Unable to Lock Database)" Error Message

How to Fix the "Failed to Synchronize All Databases (Unable to Lock Database)" Error Message

If you use a package manager on your system, you may have encountered an error message that says "failed to synchronize all databases (unable to lock database)." This error message usually appears when the package manager is unable to access or modify the package database on your system.

If you've encountered this error message, don't worry – it's usually easy to fix. Here are some steps you can try:

1. Make sure you have administrative privileges

If you're running the package manager as a regular user, try running it with administrative privileges (e.g., sudo) to see if that resolves the issue.


2. Check for other processes

Another process may be accessing the package database, preventing the package manager from modifying it. Use the following command to see which processes are using the database:


sudo lsof /var/lib/pacman/db.lck

If you see any processes listed, try stopping them and then running the package manager again.


3. Remove the lock file

If the package manager was interrupted during a previous operation, it may have left behind a lock file. Use the following command to remove it:


sudo rm /var/lib/pacman/db.lck

Then try running the package manager again.


4. Repair the package database

If the above steps do not work, you may need to repair the package database. Use the following command to do so:

sudo pacman -Syy

This will force the package manager to update the package database, which should resolve any issues with the database.

If none of the above steps work, there may be a more serious issue with your system. In that case, you may need to seek further assistance from the package manager's support channels or from a system administrator.

March 28, 2023 Read →

Converting .ts to .mp4 or .mkv using ffmpeg in Linux


Introduction

If you are working with video files, you may come across the .ts (Transport Stream) format, which is commonly used for digital television broadcasting. However, this format is not widely supported by media players and devices, so you may need to convert it to a more widely recognized format such as .mp4 or .mkv. In this article, we will show you how to use ffmpeg in Linux to convert .ts files to .mp4 or .mkv.


Step 1: Install ffmpeg First, you need to install ffmpeg on your Linux machine. You can do this by running the following command:

sudo apt-get install ffmpeg

on Arch

sudo pacman -S ffmpeg

    FFmepg Github: https://github.com/FFmpeg/FFmpeg


Step 2: Convert a single .ts file to .mp4 or .mkv To convert a single .ts file to .mp4 or .mkv, you can use the following command:


ffmpeg -i input_file.ts -c:v libx264 -preset medium -crf 23 -c:a copy output_file.mp4


This command uses the libx264 video codec to encode the video with a medium preset and a CRF (Constant Rate Factor) value of 23, which determines the video quality. The audio stream is copied without re-encoding using the -c:a copy option.

To convert to .mkv instead of .mp4, simply change the output file extension to .mkv.

Step 3: Convert multiple .ts files using a for loop If you have multiple .ts files that you want to convert, you can use a for loop to automate the process. Here's an example:


for file in *.ts; do ffmpeg -i "$file" -c:v libx264 -preset medium -crf 23 -c:a copy "${file%.*}.mp4" done

This for loop iterates through all the .ts files in the current directory and converts each one to .mp4 using the same ffmpeg command as in Step 2. The "${file%.*}.mp4" syntax is used to generate the output file name based on the input file name.


Quickly Convert:


for file in *.ts; do
ffmpeg -i "$file" -c copy "${file%.ts}.mp4"
done

Conclusion

Converting .ts files to .mp4 or .mkv is a simple process using ffmpeg in Linux. With the commands provided in this article, you can convert a single file or multiple files using a for loop. Whether you are working with digital television broadcasting or just have some .ts files that you want to watch on your media player, ffmpeg makes it easy to convert to a more widely recognized format.

March 23, 2023 Read →

The Operating System Battle Royale: Windows vs Linux vs MacOS


Windows, Linux, and macOS - are the three most popular operating systems in the world. They have been battling it out for years, each trying to outdo the other with their unique features, user experience, and overall coolness factor. But which one is the best? Let's take a look and have some fun comparing them!


Windows 

The Tried and True Ah, Windows. The OG of operating systems. It's been around since the 80s and has been a staple for many computer users. With its user-friendly interface, a wide range of software options, and compatibility with most hardware, it's no wonder that it's the most popular operating system in the world. But it's not all sunshine and rainbows for Windows users. The constant updates and never-ending pop-ups can be a nuisance, not to mention the dreaded Blue Screen of Death.


Pros:

  • Highly compatible with software and hardware, making it easy to find and use programs and devices.
  • User-friendly interface that is easy to navigate.
  • Huge range of software options is available, including many proprietary programs.
  • Great for gaming, with support for DirectX and other gaming technologies.

Cons:

  • Can be less stable than other operating systems, particularly older versions of Windows.
  • Frequent updates and security patches can be a hassle for some users.
  • Proprietary software can be expensive, particularly for professional or enterprise-level programs.


Linux

The Underdog Linux is like the hipster of operating systems - not everyone has heard of it, but those who have sworn by it. It's open-source, meaning that anyone can contribute to its development, and it's highly customizable. Linux users tout its stability, security, and the fact that it's completely free. But there are some downsides. Linux isn't the most user-friendly, and it may take some time to get used to. Plus, not all software is compatible with Linux, so you may have to hunt down alternatives.


Pros:

  • Highly customizable and open-source, so you can modify it to your heart's content.
  • Extremely stable and secure, thanks to its Unix-based architecture.
  • A vast array of free, open-source software is available for use.
  • Often used for development, coding, and other technical tasks.

Cons:

  • Can have a steep learning curve for beginners.
  • Software compatibility can be an issue, particularly with proprietary programs.
  • The user interface may not be as polished or intuitive as other operating systems.


macOS

The Cool Kid MacOS is the operating system for those who want a sleek, stylish, and seamless user experience. It's designed to work seamlessly with Apple hardware, making it the go-to choice for many creatives and professionals. With features like Siri, AirDrop, and Continuity, MacOS users have everything they need at their fingertips. But there are some drawbacks. MacOS isn't as customizable as Windows or Linux, and it comes with a hefty price tag. Plus, not all software is available for MacOS, so you may have to make some compromises.


Pros:

  • User-friendly interface that is aesthetically pleasing and intuitive.
  • Integration with Apple's ecosystem, including iPhone and iPad.
  • Built-in features such as Time Machine backup, make it easy to recover lost files.
  • Generally more secure than Windows due to Apple's strict control over hardware and software.

Cons:

  • Fewer software options are available compared to Windows, particularly in the gaming industry.
  • Expensive hardware and software, making it less accessible to some users.
  • Limited customization options compared to Linux.


So, Which One is the Best? 

Honestly, it depends on your needs and preferences. If you want a user-friendly experience and wide software compatibility, go with Windows. If you're a tech-savvy person who wants more customization options and doesn't mind a learning curve, go with Linux. And if you're looking for a sleek, seamless experience and don't mind shelling out some cash, go with MacOS.

In conclusion, the debate of Windows vs Linux vs MacOS will continue for years to come. But instead of arguing over which one is the best, let's appreciate the fact that we have three amazing operating systems to choose from. And hey, if you're feeling adventurous, why not try all three? Who knows, you might just discover your new favorite.

March 23, 2023 Read →

The Ultimate Guide to unrar Command in Linux: All Possible Use Cases


In the world of Linux, there are numerous commands that make it easier to navigate and manipulate files and directories. One such command is 'unrar,' which is used to extract files from a RAR archive. RAR stands for 'Roshal Archive,' and is a file format used to compress and archive files. In this blog, we will explore the different use cases of the 'unrar' command in Linux.


1. Extracting RAR archives


The most common use case of the 'unrar' command is to extract files from a RAR archive. To extract a file using 'unrar,' simply type the following command in the terminal:


unrar x filename.rar


where 'filename.rar' is the name of the RAR archive you want to extract. This command will extract all the files in the archive to the current directory.


2. Extracting files from password-protected RAR archives


If the RAR archive is password-protected, you will need to provide the password while extracting the files. To do this, use the following command:


unrar x -pPASSWORD filename.rar


where 'PASSWORD' is the password for the RAR archive. This command will extract all the files in the archive to the current directory.


3. Extracting specific files from a RAR archive


Sometimes, you may only need to extract specific files from a RAR archive. In this case, you can use the following command:


unrar e filename.rar file1 file2 file3


where 'filename.rar' is the name of the RAR archive, and 'file1', 'file2', and 'file3' are the names of the files you want to extract. This command will extract only the specified files from the archive to the current directory.


4. Listing the contents of a RAR archive


To view the contents of a RAR archive before extracting it, you can use the following command:


unrar l filename.rar


where 'filename.rar' is the name of the RAR archive. This command will display a list of all the files in the archive, along with their sizes, dates, and other information.


5. Testing a RAR archive for errors


Before extracting files from a RAR archive, it's a good idea to test it for errors. To do this, use the following command:


unrar t filename.rar


where 'filename.rar' is the name of the RAR archive. This command will test the archive for errors and display a message indicating whether the archive is intact or not. If there are errors in the archive, the command will display an error message.


6. Creating RAR archives


Apart from extracting files from RAR archives, the 'unrar' command can also be used to create RAR archives. To create a RAR archive, use the following command:


unrar a archive.rar file1 file2 file3


where 'archive.rar' is the name of the new RAR archive you want to create, and 'file1', 'file2', and 'file3' are the names of the files you want to add to the archive. This command will create a new RAR archive containing the specified files.


In conclusion, the 'unrar' command is a useful utility for extracting files from RAR archives in Linux. It also has several other use cases, including creating RAR archives, testing archives for errors, and listing the contents of archives. By mastering the different use cases of the 'unrar' command, you can efficiently manage and manipulate RAR archives in Linux.

March 22, 2023 Read →

Piracy Vs Free vs Premium Content: What's the Difference?


In today's world, the internet has made it easy for us to access a vast amount of information, entertainment, and educational content online. However, this easy access has also led to the issue of piracy, which has become a significant problem for content creators, publishers, and distributors.

So, what is piracy? 

Piracy is the illegal copying, distribution, and sharing of copyrighted material without the owner's permission. Piracy can occur in many forms, such as downloading music, movies, books, or software from the internet without paying for it.

On the other hand, we have free and premium content. 

Free content is available to the public without any cost, and it can be accessed and shared easily. This type of content is usually supported by ads or sponsorships.

Premium content, on the other hand, is content that requires payment before access. This content can include movies, TV shows, e-books, software, and games. Premium content is usually high-quality, and it is often available with additional features such as ad-free experiences, exclusive content, and customer support.

So, what are the differences between piracy, free content, and premium content? Let's take a closer look.

Piracy

Piracy is the unauthorized use of copyrighted material. It involves copying, distributing, or sharing content without the owner's permission. Piracy can occur in many forms, such as illegal downloads, streaming, and sharing of content.

Piracy has a significant impact on content creators and distributors, as it reduces their potential revenue streams. Piracy also undermines the incentive to create new content and may lead to a reduction in the quality and variety of content available.

Free Content

Free content is available to the public without any cost. This content can be accessed and shared easily, and it is often supported by ads or sponsorships. Free content can include articles, videos, podcasts, and music.

While free content can be great for consumers, it can also have drawbacks for creators. The revenue generated from ads or sponsorships may not be sufficient to cover the cost of producing the content. Additionally, free content may not be of high quality, and it may not offer the same level of customer support as premium content.

Premium Content

Premium content is content that requires payment before access. This content can include movies, TV shows, e-books, software, and games. Premium content is usually high-quality, and it is often available with additional features such as ad-free experiences, exclusive content, and customer support.

Premium content offers significant benefits to content creators and distributors. The revenue generated from premium content can help cover the cost of producing the content and incentivize the creation of new content. Additionally, premium content offers a higher level of quality and customer support than free content.

Conclusion

In conclusion, piracy, free content, and premium content all have their place in the digital world. While piracy may offer a cheap or free alternative to premium content, it ultimately hurts the content creators and distributors. Free content can be great for consumers, but it may not offer the same quality or level of support as premium content. Premium content, on the other hand, offers high-quality content, exclusive features, and a level of customer support that cannot be matched by free or pirated content.

As consumers, it is essential to support content creators and distributors by paying for premium content instead of resorting to piracy. By doing so, we can ensure the continued creation of high-quality content and support the growth of the digital content industry.

March 22, 2023 Read →

Why Premium Themes are Essential for a Professional Blogger Site


Blogger Site (Default)

I've used the general themes from Blogger site and it sucks. I haven't seen anyone who liked the default theme from blogger. But if you don't care about your design, and just want to write an article then I think you can go with the default one. There are few default themes available on the blogger such as 

  •  Contempo
  •  Soho
  •  Emporio
  •  Notable
  •  Essential
  •  Simple
  •  Dynamic View
  •  Picture Window
  •  Awesome Inc
  •  Ethereal and
  •  Travel

These are some of the default themes of bloggers. But if you look around the web you can get a lot of awesome and cool themes for your site.


                                           Premium Blogger Theme 


If you're serious about creating a successful blog, then investing in a premium theme for your Blogger site is essential. While default themes provided by Blogger may seem like a convenient option, they don't offer the customization and functionality needed to build a professional brand. In this article, we'll explore the benefits of using a premium theme for your Blogger site.

Every Theme is good except the default one

You can try a few websites to buy those themes and use it on your own website. Premium blogger themes have a few rich features like 

  • Customization options: Paid themes may offer more customization options than free themes. You may be able to change the layout, font, color scheme, and more to create a unique look for your blog.

  • Responsive design: Paid themes may have a responsive design that adjusts to different screen sizes, such as those of mobile devices and tablets. This ensures that your blog looks good on all devices.

  • Advanced features: Paid themes may offer advanced features, such as custom widgets, social media integration, and SEO optimization tools. These features can help you improve the functionality of your blog and attract more visitors.

  • Support: Paid themes may come with customer support from the theme developer. This can be useful if you encounter any problems or have questions about how to use the theme.

  • Ad-free: Some paid themes may be ad-free, which means that you won't have to display ads on your blog unless you want to.


Keep in mind that these features may vary depending on the theme and the platform. It's always a good idea to read the theme's documentation and reviews before purchasing to ensure that it meets your needs.


                                            Appy Blogger Premium Theme

I assume you buy a premium theme. You just need the .xml file to update the look and feel of your blogger site.

Here's a few steps of how to do it:


  1. Go To Blogger Settings>Theme  
  2.  Now on the right side, you will see a customize text beside your current theme. Then you've to click the Customize button and then, restore button. Then, you'll see an upload prompt where you've to select the .xml file and upload it. 


  3.  That's it. Enjoy  


In conclusion, using a premium theme for your Blogger site is essential for creating a professional brand and providing an excellent user experience. The benefits of customization, responsiveness, advanced features, customer support, and ad-free experience far outweigh the cost of purchasing a premium theme. So, if you're serious about building a successful blog, invest in a premium theme today!

March 21, 2023 Read →

How do you add Google AdMob to your AdMob account without having a custom domain?

I was having a massive problem with it at first. Then, quickly search "How to add Google Admob app-ads.txt?". Most of those videos were total bullshit and some of them were just a few helpful. 


After researching a few times, I found a website where I could put my "app-ads.txt" file and solve my problem. Though I needed to think more clearly that time. All I need is to put my app-ads.txt file and get going.


And after a few months (7-8) months later that website got canceled and all my apps were fucked up. No revenue isn't generating from my app. 


Then I found this *Blogger* website where I could put my app-ads.txt to solve not having a custom domain problem. Let's see if this method works or not.


Thanks, Blogger!


Note: I might be blogging now if this method works LOL

January 23, 2023 Read →
Energy Loading...

Search the Blog

Press ESC to close