Arrays Explained: Basics things You Need to Know


Arrays are one of the most fundamental data structures in programming. They’re simple to use, yet powerful in storing multiple elements efficiently. But have you ever wondered what happens behind the scenes when you use an array? Why do different programming languages have various ways of declaring arrays? What are static and dynamic arrays, and how do they differ? How does an array store data in memory (RAM)? Let’s dive in and explore!

What is an Array?

An array is a container for storing data. Think of it like a series of boxes, each capable of holding one piece of data. When you store data in an array, it’s saved in the computer’s RAM (Random Access Memory), just like any other variable. Throughout this post, when I refer to "memory," I’m specifically talking about RAM.

Arrays store data as bytes. For example, if we add the values 4, 6, 3, 5, and 9 into an array, each of these numbers (depending on the type of data, like integers) might take up a certain number of bytes. In this case, assume each number takes 1 byte (or 8 bits). So, we’re storing five bytes of data in the array, and this is how they’d be arranged in memory:

You access the data in an array by its index. In most programming languages, array indices start at 0, meaning the first element is at position 0. In a fixed-size array, you can easily access, modify, or delete elements at any index.

Memory Allocation in Arrays

When we create a fixed-size array, we inform the system of the amount of memory we need. The system then allocates that memory and returns a reference (or address) to it. This is where we can start performing operations on the array.

Here are a few common operations and their Big O time complexities:

  1. Access O(1)

  2. Modify 0(1)

  3. Remove 0(n): Let’s break down the Remove operation: When you remove an element, say from the middle of an array, the remaining elements must shift to fill the gap. For example, if the array is [1, 2, 3, 4, 5] and you remove 3, it becomes [1, 2, _, 4, 5]. After removing 3, the remaining elements are shifted to fill the space: [1, 2, 4, 5, _]. Removing takes constant time, but shifting elements takes O(n) time, where n is the number of elements in the array.

  4. Create 0(n)

When you create an array, the process involves allocating space in memory. In a fixed-size array, the memory is reserved ahead of time, making operations constant. However, dynamic arrays are a bit more complex.

Static vs. Dynamic Arrays

There are two main types of arrays:

  1. Static Array: The size is fixed when you create the array.

  2. Dynamic Array: The size can grow as needed. It’s not fixed.

Now that we’ve covered static arrays, let’s move on to dynamic arrays.

Understanding Dynamic Arrays

As mentioned, a dynamic array doesn’t require you to specify a size up front. Languages like Python and JavaScript use dynamic arrays by default. However, no array can be truly unlimited in size. Let’s say a dynamic array starts with a size of 3. When you fill all three positions, the array creates a new, larger array behind the scenes. This new array is typically double the size of the original one. For example, if the original array has a size of 3, the new one will have a size of 6.

Here’s what happens under the hood:

  • A new array with double the size (6) is created.

  • The values from the old array are copied into the new array.

  • The old array is deallocated (freed from memory).

This process of reallocating memory and copying elements takes O(n) time.

Time Complexity of Dynamic Array Operations

Dynamic arrays have similar time complexities to static arrays:

  • Access: O(1)

  • Modify: O(1)

  • Remove: O(n)

  • Create: O(n)

That’s the essence of arrays! I hope this explanation was short and simple enough. If you have any suggestions or if something isn’t clear, feel free to let me know!

Share:

Unofficial Warp Client on Linux (WGCF+wireguard)

WGCF is an unofficial, cross-platform CLI for Cloudflare Warp. It works with Wireguard. So before installing WGCF make sure you’ve installed

`wireguard-tools`

`wireguard-dkms` (if you’re using a Linux Kernel older than 5.6)

Note : You’ve to restart your system if you install wireguard-dkms.

You can install pre-compiled binary file from it’s releases or you can install it from AUR if you’re using Arch derivatives.

Install binary package
Download the package you need from release page. Then rename the file wgcf, make it executable and copy it to /bin directory.
```
chmod +x wgcf
sudo cp wgcf /bin
```
Or you can install from AUR if you use Arch

`yay -S wgcf`
Now we will create a Warp account

`wgcf register`
And generate a Wireguard configuration using that account information

`wgcf generate`
We’ve to connect to Warp using that Wireguard configuration. It’d be much easier if you put that configuration file in /etc/wireguard

`sudo cp wgcf-profile.conf /etc/wireguard`
Let’s connect now

`wg-quick up wgcf-profile`
If you want to disconnect, run

`wg-quick down wgcf-profile`
Probably you’d like to run Warp every time when your system boots. You can do that with help of systemd

`systemctl enable --now wireguard@wgcf-profile`
Share:

Guide to Installing MariaDB/MySQL on Arch Linux

Introduction

Installing MariaDB or MySQL on Arch Linux can be a daunting task, especially if you're not familiar with the intricacies of the Arch environment. This guide aims to be a comprehensive, one-stop resource to help you get MariaDB/MySQL up and running on your Arch Linux machine.

Preparation

Before we dive into the installation process, ensure your system is up to date. Run the following command:

sudo pacman -Syu

This updates your system and minimizes the chances of encountering issues during the installation process.

Step 1: Installing MariaDB/MySQL

Arch Linux offers both MariaDB and MySQL for installation. MariaDB is a community-developed fork of MySQL, and it's often recommended due to its active community and consistent updates.

To install MariaDB, use the following command:


sudo pacman -S mariadb


Alternatively, for MySQL, use:


sudo pacman -S mysql

Step 2: Initializing the Database

Once the installation is complete, you need to initialize the database directory. This step is crucial for setting up the system tables and preparing the database for use.

Run the following command:


sudo mysql_install_db --user=mysql --basedir=/usr --datadir=/var/lib/mysql

If the initialization is successful, you will see a message indicating that the system tables have been installed.

Step 3: Starting the MariaDB Service

With the database initialized, you can now start the MariaDB service. Use the command below:


sudo systemctl start mysqld

In case of errors, check the status of the service for more details:


systemctl status mariadb.service

and
journalctl -xe

Step 4: Securing the Installation

Securing your MariaDB installation is an important step to ensure your database is protected. Run the following command to start the secure installation process:


sudo mysql_secure_installation

You'll be prompted to set the root password and make several security-related decisions. Follow the prompts to complete the setup.

Step 5: Creating Your First Database

Now that MariaDB/MySQL is up and running, you can create your first database. Access the MariaDB/MySQL shell with the command:


sudo mysql -u root -p

Enter the root password you set during the secure installation process. Once in the shell, create a new database with:


CREATE DATABASE mydatabase;

Replace "mydatabase" with your desired database name.

Conclusion

Installing MariaDB/MySQL on Arch Linux can be challenging, but by following this guide, you should have a functioning database system ready for use. Remember to keep your system and database software updated to avoid potential issues. If you encounter any problems, refer to the Arch Linux forums and documentation for additional support.

Summary

  • System Update: sudo pacman -Syu
  • Install MariaDB: sudo pacman -S mariadb
  • Initialize Database: sudo mysql_install_db --user=mysql --basedir=/usr --datadir=/var/lib/mysql
  • Start MariaDB Service: sudo systemctl start mysqld
  • Secure Installation: sudo mysql_secure_installation
  • Create Database: CREATE DATABASE mydatabase;

Good luck, and happy coding! 🎉

Share:

Mastering Productivity: Firefox's URL Bar as a Powerful Calculator


Introduction:

When it comes to browsing the web, Firefox has long been a popular choice among users due to its flexibility and customization options. However, did you know that there’s a hidden gem within Firefox that can transform your browsing experience? By enabling the calculator functionality on the Firefox URL search bar, you can perform quick calculations without the need for a separate calculator application. In this article, we will guide you through the steps to unlock this feature and enhance your productivity while using Firefox.

Step 1:

Accessing Firefox’s Advanced Configuration Settings To begin, we need to access Firefox’s advanced configuration settings, also known as about:config. Follow these steps:

  1. Open a new tab in your Firefox browser.
  2. In the URL bar, type about:config (without the quotation marks) and press Enter.
  3. A warning message will appear, acknowledging the risks of modifying advanced settings. Proceed with caution as these settings control the browser’s behavior.
  4. Click on the “Accept the Risk and Continue” button to access the configuration settings.

Step 2:

Enabling the Calculator Functionality Once you have successfully accessed the advanced configuration settings, it’s time to enable the calculator functionality on the URL search bar. Here’s how:

  1. In the search bar within the about:config page, type “browser.urlbar.suggest.calculator” (without the quotation marks).
  2. The search results should display a single preference named “browser.urlbar.suggest.calculator.”
  3. By default, the value of this preference is set to “false.” To enable the calculator, double-click on the preference.
  4. The value will change to “true,” indicating that the calculator functionality is activated.
firefox config

Step 3:

Utilizing the Calculator on the Firefox URL Search Bar Congratulations! You have successfully enabled the calculator functionality on the Firefox URL search bar. Now, let’s put it to use:

  1. Click on the URL bar at the top of your Firefox browser window.
  2. Begin typing a calculation, such as “2 + 3 * 4” (without the quotation marks).
  3. As you type, you will notice that Firefox automatically suggests the calculated result in a dropdown list below the URL bar.
  4. Press Enter to select the suggested result, and Firefox will instantly display the answer in the URL bar.

Conclusion:

Following these simple steps, you have unlocked a powerful feature in Firefox that allows you to perform quick calculations directly from the URL search bar. This hidden calculator functionality enhances your browsing experience by eliminating the need for a separate calculator application. Whether you’re a student, professional, or simply someone who frequently performs calculations, Firefox’s built-in calculator is a valuable tool at your fingertips. Boost your productivity and streamline your workflow with this fantastic feature in Firefox. Give it a try today and enjoy the convenience of on-the-fly calculations while browsing the web.

Share:

Beyond SVG: Discovering the Top Alternatives for Flutter Development


Introduction:

When developing Flutter applications, incorporating SVG (Scalable Vector Graphics) files can add visual appeal and flexibility to your UI. However, the standard approach of using the flutter_svg package to render SVG files may result in larger file sizes, potentially impacting app performance. In this article, we will explore an alternative method that allows you to utilize SVGs in Flutter without the need for additional assets. By following the steps outlined below, you can achieve faster, smoother rendering and smaller file sizes for your Flutter projects.

Step 1:

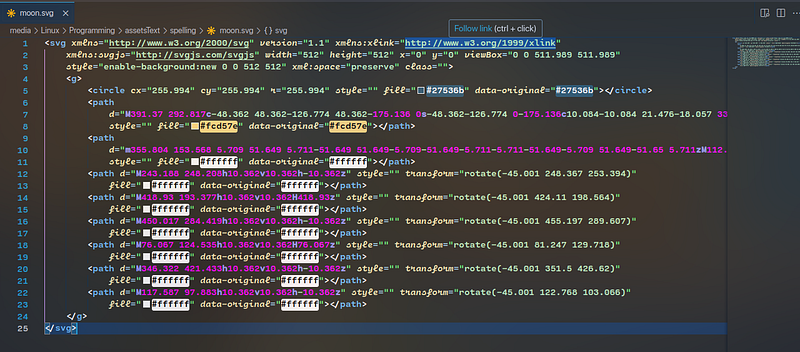
Copy the SVG Code To begin, locate the SVG file you wish to incorporate into your Flutter project. Instead of using the flutter_svg package, we will convert the SVG code directly into Flutter code. Copy the SVG code from your file.

Step 2:

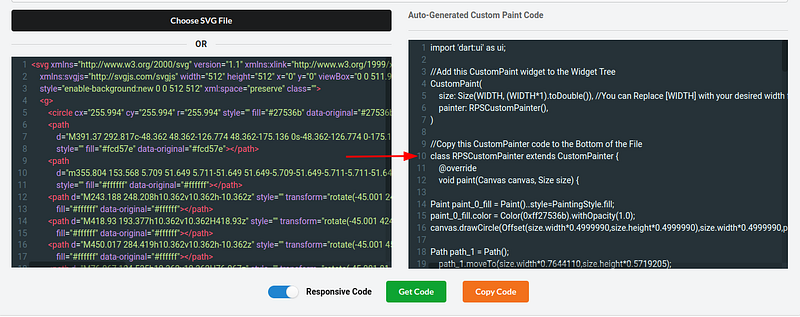
Convert SVG to Flutter Painter Next, visit the website “Flutter Shape Maker” at https://fluttershapemaker.com/. This online tool enables you to convert SVG code into Flutter CustomPainter code, which can be directly used to render the SVG in your Flutter project.

Paste the SVG code into the provided text box on the Flutter Shape Maker website. The tool will automatically generate the corresponding Flutter CustomPainter code based on the SVG. This code will contain the necessary instructions to render the SVG as a visual element in your Flutter UI.

Step 3:

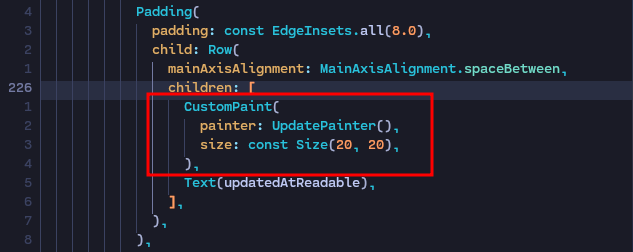
Implement the CustomPainter in Your Flutter Project Now that you have the generated CustomPainter code, you can incorporate it into your Flutter project. Create a new Flutter widget or modify an existing one to include the CustomPaint widget. The CustomPaint widget allows you to draw arbitrary graphics using the provided CustomPainter implementation.

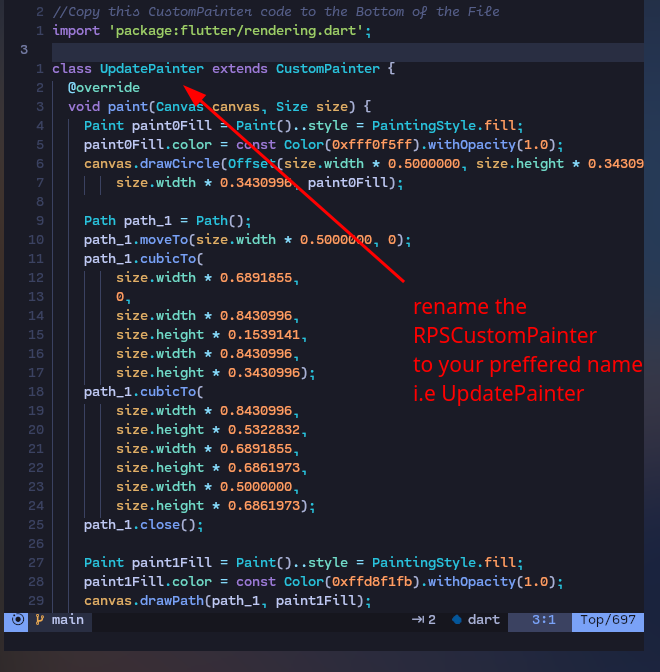
Inside the CustomPaint widget, set the painter property to an instance of the CustomPainter class generated by the Flutter Shape Maker website. This will ensure that the SVG is rendered correctly within your Flutter UI.

Additionally, remember to specify the desired size for the SVG by setting the size property of the CustomPaint widget. This ensures that the SVG is displayed at the intended dimensions within your UI.

Conclusion:

By following the steps outlined above, you can optimize the rendering of SVG files in your Flutter projects. By converting the SVG code into Flutter CustomPainter code using the Flutter Shape Maker website, you can eliminate the need for additional assets and achieve improved performance and smaller file sizes. This approach allows for faster and smoother rendering of SVGs, enhancing the overall user experience of your Flutter applications.

Remember to apply the suggested method the next time you need to incorporate SVGs in your Flutter projects, and enjoy the benefits of optimized SVG rendering.

Share:

Read Medium Article for Free

It is just quick and simple.

replace the medium.com/

with scribe.rip/


example:

Medium URL:

    ```https://medium.com/flutter/2023-google-mobile-ads-updates-for-flutter-16b603df9ec9```

Free URL:

    ```https://scribe.rip/flutter/2023-google-mobile-ads-updates-for-flutter-16b603df9ec9```


that's all :)

Share:

How to compress json file


For a single file use this:

 jq -c . all_json_words.json > minify_words.json


to use it in a for loop

for file in *.json; do
    jq -c . "$file" > "${file%.json}.min.json"
done
Share: